Quote Management System
The Quote Management System is designed primarily for the tracking of commercial jobs and other potential sales opportunities. The Quote Management System tracks jobs prior to the determination of the customer and the final item list, and can link a single job to multiple customers.
The Quote Management System is comprised of job quotes and customer assignments. A job quote consists of such items as a job name, description, architect, general contractor, various dates, products and prices. Customer assignments are the customers who have been given each quote. Multiple customers can be assigned to the same quote.
Orders can be automatically generated for the designated customer when a quote is awarded.
Entering a Quote and Generating an Order
Entering a Quote and Generating an Order
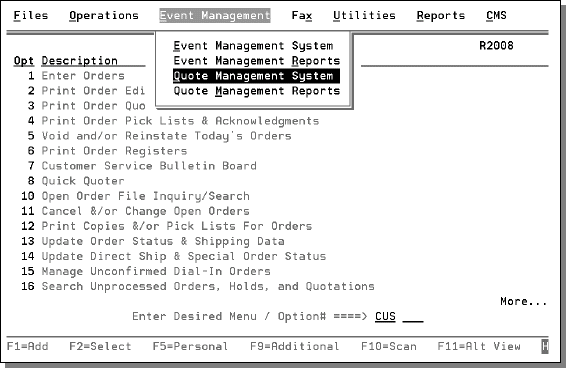
1. The Quote Management System is accessed from the pull down user menu bar on the Event Management Menu. You must be assigned one of the pull down menu bars in order to access the Quote Management System.
- If you are experiencing problems accessing the menu bar check the User Profile. Ensure a menu bar (i.e. MNUB04CL) is displayed in field Attention Program on the fourth screen of the WRKUSRPRF command.
- Not all menu bars contain the Event Management and Quote Management options.
Press the Esc key to access the assigned menu bar.
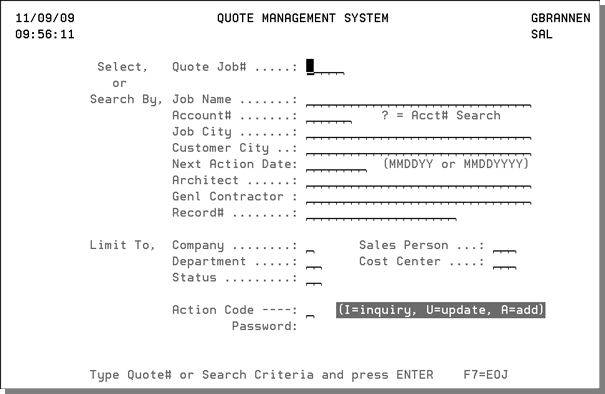
2. The following screen is the initial screen of the Quote Management System. There are three modes of operation controlled by the action codes; Add, Update, and Inquire. To add a new quote to the system, leave all fields empty except for an A in the action code field. The system assigned a new quote job number and displays the Quote Entry Profile Screen. To update or inquire about existing quotes, enter a job number or search by any of the options displayed. While searching, you can also limit the quotes to be displayed by entering into any of the Limit To fields.
|
Field Name |
Description/Instructions |
|
Quote Job # |
Enter an existing job number if available. Leave this field when searching or adding. The quote job number is a unique number assigned by the system to each quote. |
|
Job Name |
Enter the beginning characters of a job name in order to search alphabetically by job name. The system lists quotes by job name beginning with your entry. |
|
Account # |
Enter an accounts number in order to search for all quotes assigned to that account. Enter a question mark (?), and press Field Exit to search for account numbers |
|
Job City |
Enter the beginning characters of the city in which a job is located. The system lists quotes alphabetically be job city beginning with your entry. |
|
Customer City |
Enter the beginning characters of city in which a quoted customer is located. The system lists quotes alphabetically be job city beginning with your entry. |
|
Next Action Date |
Enter a date in order to search for all quotes with an action date on or greater than the specified date. Action dates are entered on quotes to remind you of actions to take on a later date. |
|
Architect |
Enter the beginning characters of the name of an architect beginning with your entry. |
|
Genl Contractor |
Enter the beginning characters of the name of a contractor by which to search. The system displays quotes alphabetically by architect beginning with your entry. |
|
Record # |
Enter the beginning characters of any of the product codes used in the Quote Management System. The program displays quotes with product record numbers alphabetically beginning with your entry. Note that the term record number is used generically because the Quote Management System enables the entry of categories of products as well as specific item numbers. For example, a quote could simply be for any product of a certain manufacturer, at a certain quoted price level. |
|
Limit To Fields |
Enter a parameter (i.e., company number, dept. status, salesperson, etc.) to limit the search. Notes:
|
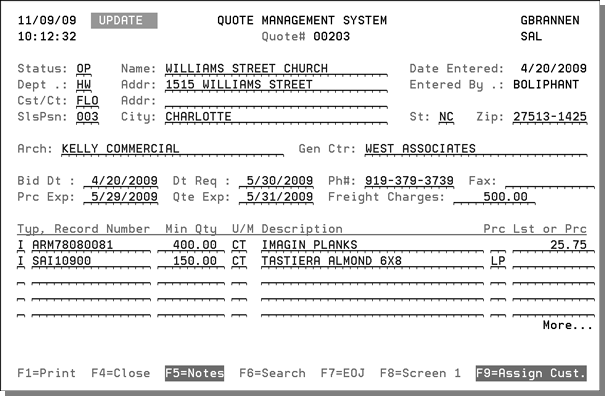
3. Press Enter to access the Quote Profile Screen. The quote job number displays at the top of the screen. The top half of the screen includes basic information regarding the job. The bottom half of the screen enables the entry of products that can be used on the job.
|
Field Name |
Description/Instructions |
|
Status |
Enter the status code of the quote. Op indicates open, CL indicates closed. |
|
Dept |
Enter the department code to be assigned to this quote. |
|
Cst/Ct |
Enter the cost center code, if applicable. |
|
Slspsn |
Enter the salesperson number, if applicable. |
|
Bid Date |
Enter the date the bid was entered, if applicable. |
|
Date req |
Enter the date the material is required for the job. |
|
Prc Expir |
The date the quoted prices expire. |
|
Dte Expir |
The date the entire quote expires. |
|
Freight Charges |
Freight charges that figure into the quote totals, if applicable. |
|
Typ |
The type code representing the type of record being entered. C - Item Class M- Manufacturer L - Product Line P - Price Class I - Item Number * - Indicates a miscellaneous entry. When using this code you can specify any descriptive information as the product code and description. This feature is helpful to outside salespeople who are unfamiliar with product codes and numbers. |
|
Record Number |
Enter the record number corresponding to your Type field entry. Enter an item class code if type is C, manufacturer if type is M, item if type is I, and so on. |
|
Min Qty |
Enter the minimum quantity being quoted. The prices quoted are for at least this quantity. |
|
U/M |
Enter the unit of measure code. |
|
Description |
The description of the record number entered appears here after you press Enter when adding new products. You can override this field for this quote to any description you want to appear on the quote. If a description is not entered, one will automatically be entered to match the product code. |
|
Prc List |
Enter a price list number or an actual price in the next field. |
|
Price |
Enter a price list number or an actual price or a price list number in the previous field. |
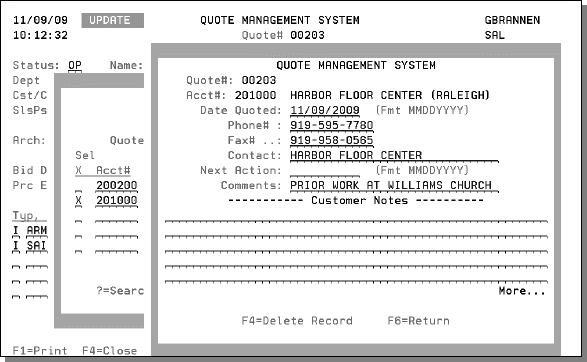
4. Press F9 to access the Customer Assignment Screen. This screen enables you to add customers to the list of customers assigned to this quote, or select customers already assigned.
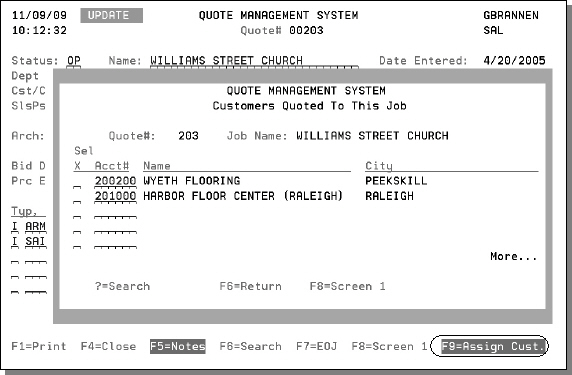
5. To add notes or update information, select a customer and press Enter.
|
Field Name |
Description/Instructions |
|
Date Quoted |
Enter the date the quote was submitted to this customer. The default is today's date. |
|
Phone# Fax# |
The customer's phone/fax numbers. You can change these fields for this quote only. If you do so, the numbers will not change in the Billto File. |
|
Contact |
The default is the customer's name. You can override contact names in this field for this quote. |
|
Next Action |
Enter the next action date, if applicable. You can search by the next action date. |
|
Comments Customer Notes |
Enter comments/notes for this customer and quote, if applicable. |
6. Press F6 to return to the Quote Management Profile screen.
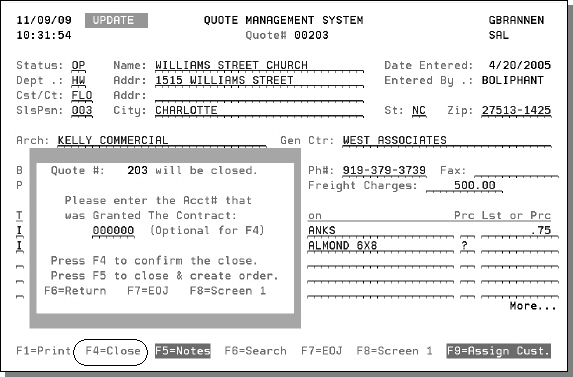
7. To close the quote press F4. The F4=Close option is only available if you are in update mode.
8. You have the following options:
- Press F4 again if you want to close the quote without generating an order. If you enter an account number, it must first have been assigned to the quote. That account is then highlighted for future reference when the quote is displayed. If the job was awarded to a competitor's customer, we recommend that you set up an account number for competitor's customers (in other words, a single generic account number with a name of Competitors and use the account number here. You may also want to use the notepad to explain how the job was awarded and completed.
- Press F5 to automatically generate an order within Order Entry.
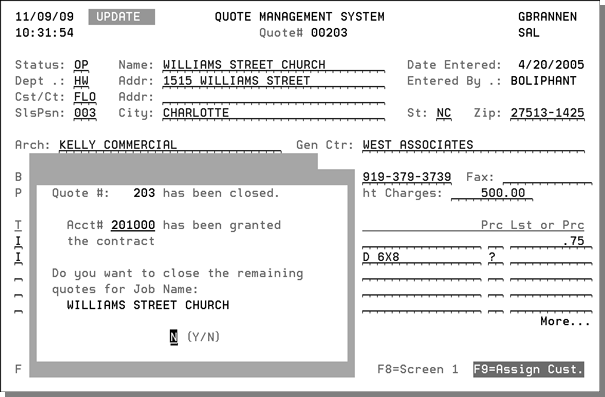
- The screen shown above enables you to also close other quotes that have the same job name. Enter Y or N and press Enter to access the next screen.
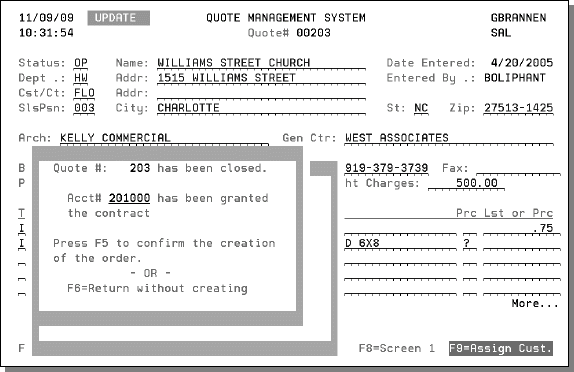
- Press F5 to confirm the creation of an order and to proceed to Order Entry. The order is assigned a reference number and the Order Entry screen displays.
Quote Management Reports
The Quote Management System contains options to list quotes based on many of the same selection parameters as the Search Screen. The first screen you will see after selecting this option allows to choose the parameters you want to include in the report. You can run the report for one quote or several.
To search through a listing of available parameters, enter a ? in the applicable field and press Enter. In the example below, the Job Names are being searched.
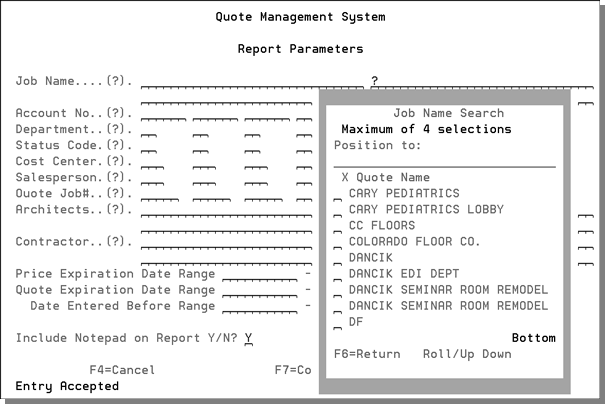
Press F7 to go to the following sort screen. You can specify as many sort and sub-sorts as needed by entering 1, 2, 3, and so on in the desired sequence. Enter Y in the Print Counts column for a count of records at any of the sort levels.
